Trial Balance Data
From the 'QuickBooks Data' menu on the main Editor page, click on the 'Trial Balances Setup / Update' to get to this Trial Balance maintenance page. A company must be loaded before this menu item is available.
Data that is used in the statements comes from the trial balance numbers that are downloaded from QuickBooks. This page is used to manage the trial balances. Each column in a statement has a default trial balance assigned. That default trial balance is used to retrieve the numbers that are used in the statement. For more information on adding columns to statements and assigning trial balances to the columns see Statement Column Maintenance.
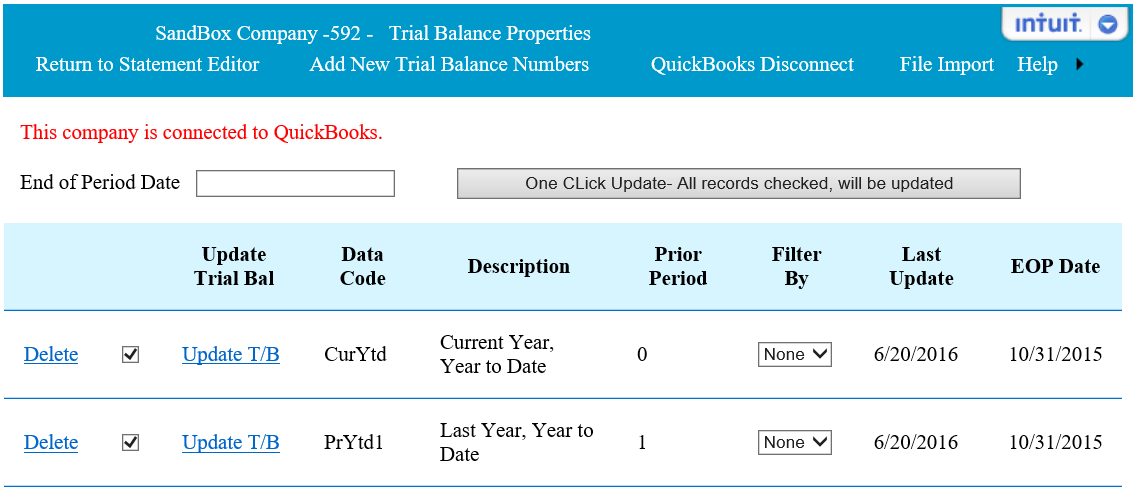
From this page the Trial Balances that are assigned to this company can be managed. When the page is first loaded, it will list all of the Trial Balance information that is currently assigned to this company.
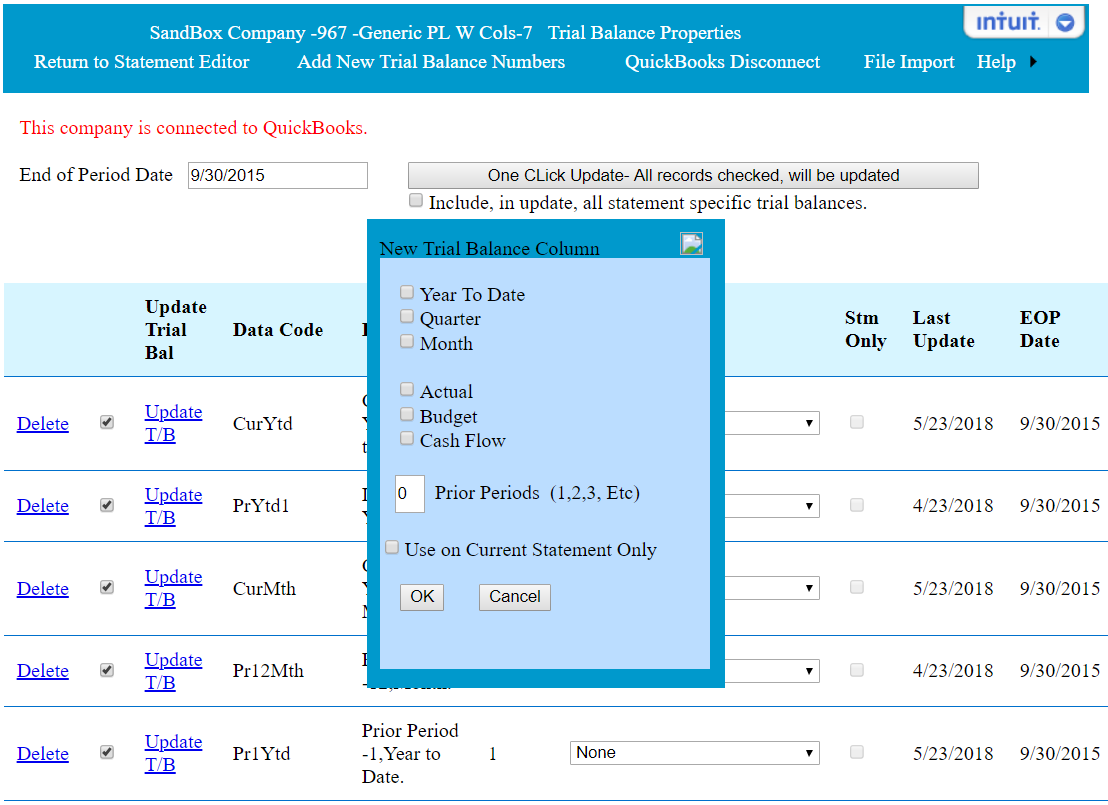
New Trial Balance information can be added to this company by clicking on 'Add New Trial Balance Numbers'. This will bring up a pop-up, see below, where the period can be selected. Select 'Year to Date' to get a Trial Balance with year to date totals. Selecting the 'Month' or "Quarter' will get the Trial Balance for the appropriate period. Select 'Actual', 'Budget' or Cash Flow as appropriate. The Cash Flow selection will create a trial balance with the changes in the Balance Sheet accounts for the period. If you wish to have the information for a prior period, place the number that represents the periods you want. For instance, the prior year for a year to date is 1, The month for the prior year is 12. To create a year to date trial balance for the prior months, check the 'Set YTD Prior Periods to Months' check box. After clicking on the 'OK' button the new Trial Balance information will be added to the company. To populate the new Trial Balance with information, complete an update.
The maximum number of common (available to all statements) Trial Balances is 25 per company. If additional Trial Balances are needed, an additional unlimited Trial Balances can be added for each statement. When this option is activated an additional check box will appear on the pop-up box to make a new Trial Balance specific to the currently loaded statement. Contract support to activate this option.
To update the data from the QuickBooks accounting program, first enter the end of period date into the 'End of Period Date' text box. To update all of the Trial Balance data, click on the 'One Click Update' button. To update selected records, uncheck the Trial Balance record you do not want updated, before clicking on the 'One Click Update' button. To update a single Trial Balance record, click on the 'Update T/P' link for the selected Trial Balance data. When updating a Budget Trial Balance, if there is more than one Budget for the 'End of Period Date', a pop-up screen will ask for the Budget you wish to update.
Update selected columns.
Trail balances can be set up to only update when the 'Update T/P link' on a single trial balance is clicked. Some time you many not want all of the balances updated with the 'One Click' update. For example, if you want to show a full year column for the prior year, you would want the end of period date to stay the same during the interim reporting (ie 12/31/2015). To set a trial balance to update individually only, unclick the check box next to the 'Update T/P button', enter the desired end of period date, and then click on the 'Update T/B' button. If this feature is used, and you wish to change the end of period date for those Trial Balances, you will then need to update them individually, by entering the new end of period date and clicking on the 'Update T/P' link button. This may also be true, at the beginning of a new year, if there is more than one budget for the new year.
To create a Trial Balance with only the data from a particular Class, Division, Dept, or Location, select, prior to clicking, the appropriate Class/Dept from the 'Filter By' drop down box on the appropriate Trial Balance record. By default only one Class/Dept can be included in each Trial Balance. If more than one Class/Dept is needed, contact support about the option of including multiple Classes/Dept's in one Trial Balance. See 'Classes/Dept's' for more information on this feature.
If the current year has more than one budget, a default budget will need to be selected. When a end of period date is entered, and if there is more than one budget for that year, you will be given the option of selecting a default budget. You can also select a default budget for each budget Trial Balance by clicking on the 'Update T/B' button.
Setting the accounting method to cash vs accrual: Under the 'Other Options' menu, select 'Select Accounting Method'.
A Trial Balance can also be deleted from the company, by clicking on the 'Delete' link. In order to delete a Trial Balance, it must first be deleted from all existing statements.
The company must be connected to QuickBooks before the trial balances can be updated from the QuickBooks accounting program. When the QuickBooks Online company is first loaded it is connected to QuickBooks. If you wish to disconnect from QuickBooks Online click on the 'QuickBooks DIsconect' menu item. If you wish to reconnect to QuickBooks Online, click on the 'Connect to QuickBooks'. menu item. See 'Connecting to QuickBooks' for more information.
NOTE: Because of the type of connection to a QuickBooks DeskTop company, functions that require update from QuickBooks will take extended time to process. These include creation of new statements, exporting and updating statements to Excel and updating from the Trial Balance Maintenance page.