Excel Print Options
The Excel Print Option setup page is used to select the default setting that will be used when exporting to Excel for printing. Once exported, Excel can be used to override or adjust any of the print settings.
This page can be reached from two different menus.
1- .From the 'Print Option' menu item on the 'Statement and Chart Export / Update' page.
2- From the 'Excel Print Export Properties' menu item under the 'Statement Maintenance' drop down menu on the main editor page. A statement must be loaded for this menu item to be assessed.
The following page will load.
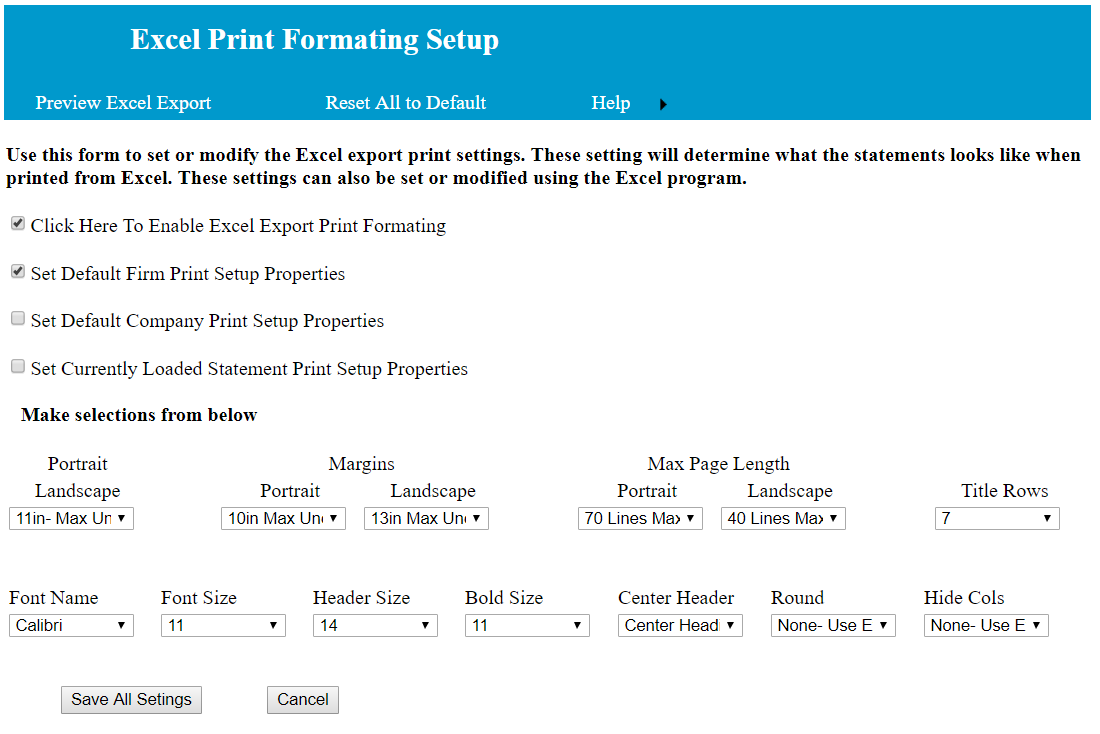
The following options for default settings are available.
When first loaded, all settings are set to the default setting. One of the default setting is to disable this function. To enable the default print options, click on 'Click Here to Enable Excel Print Formating.
There are three option for setting the print options.
1- The firm level settings, are the settings that will be used if there are no Company and statement specific settings. In most cases the default firm settings will handle the statement and chart printing.
2- If there are any Company settings, they will be used if there are no statement specific settings.
3- If there are any statement specific settings, they will override all other settings for the specific statement. The specific statement is the one that is currently loaded. If a statement is not currently loaded the statement specific setting will not be available.
With each default setting option (Firm, Company, and statement specific) , the following choices are available.
1-The Portrait/Landscape setting determines the orientation of the printed pages. This selection is determined by the uncompress width of the statements in the Editor. As an example using the default settings, if the uncompress width is more that 11 inches, the orientation will be set to landscape. The statement width will be compressed to fit the page orientation.
2- The margin settings determine the margins of the printed pages. The margin setting is determined by the uncompressed width of the statements in the Editor. Example, if the default setting for Portrait is 10 inches, Narrow margins will be used if the uncompressed width is more that 10 inches, otherwise Normal margins will be used.
3- The Page Length setting, determines if the report will be printed on a single length page or on multiple pages. Example, if the default setting for Portrait is 70 lines, statements with more that 70 lines will be printed on multiple pages, otherwise the statement will be printed on one page.
4- Title Rows determines how many, if any, when printing on multiple pages, title rows will be carried forward to each page.
5- Font names and sizes gives you the option to use different fonts and font sized.
6- Center Header, caused the header to be centered on the statement page.
7- This option rounds the number on statements to $1.00. No cents will be included on the statement.
8- This options hides any reports columns that are not within the current end of period date.
In addition to the above, the following settings are available.
1- 'Not Set' , options that are not set will be ignored and the prior default setting will be used. Example, if the specific statement is set to 'Not Set' then the Company settings, if any, will be used.
2- 'None', options that are set to none will override all prior settings and will cause the default settings of Excel to be used.
3- Specific settings, example, 'Portrait; print multiple pages, use specific margin setting, etc.
To set Page Breaks and Hi Light for selected lines see 'Line Formats'.